Every decision Azure makes about who can do what starts in one place: Microsoft Entra ID. Before you deploy a single virtual machine or storage account, it’s worth understanding this layer properly — because every access decision your environment makes will flow through it.
This article covers the three things you need working knowledge of before anything else in Azure makes sense: users, groups, and role-based access control (RBAC). It’s written from real deployment experience across GIC, GCC, and traditional enterprise environments — not paraphrased from documentation.
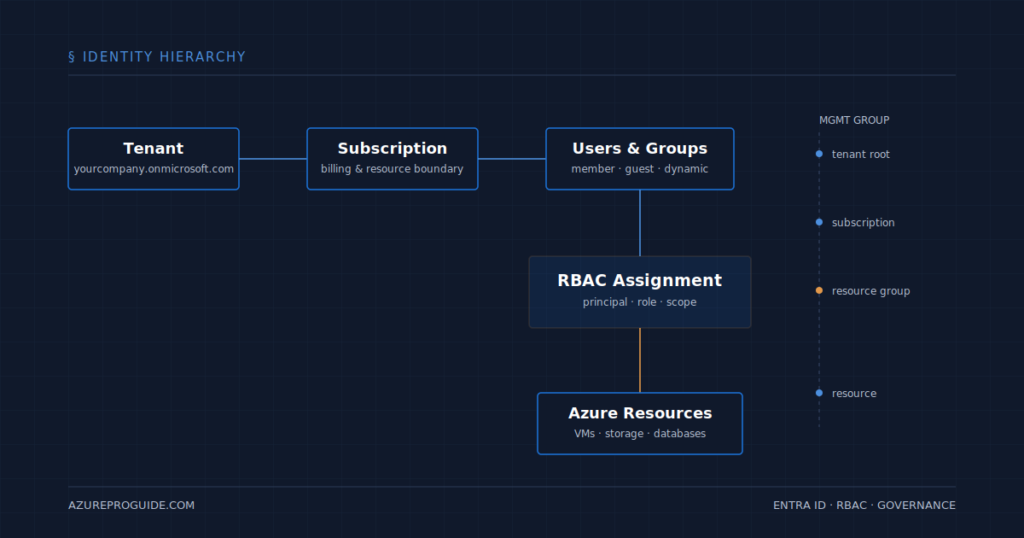
Tenants, Subscriptions, and Management Groups
Three terms worth anchoring before going further:
- Tenant — your organisation’s dedicated instance of Entra ID. When your company signs up for Azure, Microsoft creates a tenant with a unique ID, typically mapped to a domain like
yourcompany.onmicrosoft.com. - Subscription — a billing and resource boundary. Every Azure resource — VMs, storage accounts, databases — lives inside a subscription, and a subscription trusts exactly one Entra ID tenant for authentication.
- Management group — a container above subscriptions that lets you apply governance policies and access controls across many subscriptions at once. Larger organisations use these to avoid repeating the same configuration across dozens of subscriptions.
The hierarchy flows: management group → subscription → resource group → individual resource. This matters a great deal once you start assigning access, which is where we’re headed.
Real-world context: Hybrid identity is extremely common across GICs, GCCs, and shared-services setups. On-premises user accounts sync to Entra ID on a schedule via Entra Connect. Engineers sign in once with their corporate credentials and get seamless access to both on-premises systems and Azure resources — no separate cloud password, no duplicate accounts to manage.
Managing Users
Entra ID has two kinds of user accounts:
- Member users — full members of your organisation’s tenant, created directly in Entra ID or synced from on-premises Active Directory via Entra Connect.
- Guest users — external identities invited through Azure B2B (business-to-business) collaboration. They authenticate with their own email — a Gmail address, or another company’s Microsoft account — and appear in your directory with
#EXT#in their User Principal Name, for examplepriya_contoso.com#EXT#@yourcompany.onmicrosoft.com.
For one or two users, the Entra admin centre (entra.microsoft.com) is fine. For anything larger, scripting is the practical choice:
# Create a single user via Azure CLI
az ad user create \
  --display-name "Priya Sharma" \
  --user-principal-name priya@yourdomain.com \
  --password "TempPass@2026!" \
  --force-change-password-next-sign-in true
A few things worth knowing about guest users specifically:
- They’re assigned the Guest User role by default, which has restricted read access to the directory.
- You can restrict guests from enumerating other users and groups via External collaboration settings.
- Guest users typically count against your licence quota at a set ratio relative to paid Entra ID P1/P2 licences — check current terms before planning at scale, as licensing details change.
Managing Groups
Groups are how you control access at scale. Rather than assigning permissions to individual users one at a time, you assign them to a group and manage membership centrally — the assignment doesn’t change even as people join or leave the team.
There are two membership types worth knowing:
- Assigned membership — you manually add and remove members. Simple, predictable, but doesn’t scale well past a certain team size.
- Dynamic membership — Entra ID evaluates a rule against user attributes (department, job title, location) and automatically adds or removes members as those attributes change. This is where groups become genuinely powerful for larger organisations.
A dynamic rule looks like this:
(user.department -eq "Engineering")
One practical detail that catches people out: dynamic group membership isn’t instant. After you save a rule, it can take anywhere from a few minutes to a few hours for all matching users to be evaluated and added, depending on directory size. Plan for this during onboarding workflows — don’t assume a new hire has access the moment their department field is set.
Dynamic membership requires an Entra ID P1 licence (included in Microsoft 365 E3 and above, or purchasable as a standalone add-on) — on the free tier you can still create groups, they just need to be managed manually.
Controlling Access with Azure RBAC
Creating users and groups is only half the story. The other half is deciding what those users and groups can actually do with your Azure resources — that’s Azure Role-Based Access Control.
RBAC answers a simple question: who can do what, on which resource? Every access decision in Azure goes through it. An RBAC assignment has three parts:
- Security principal — the who. A user, a group, a service principal (an application identity), or a managed identity.
- Role definition — the what. A named collection of permitted actions. The built-in Virtual Machine Contributor role, for example, allows creating and managing VMs but not managing the virtual network they sit on.
- Scope — the where. The specific resource, resource group, subscription, or management group the assignment applies to.
The scope hierarchy
Assignments at a higher level are inherited by everything below:
Management Group          ← broadest scope
  └── Subscription
        └── Resource Group
              └── Individual Resource   ← narrowest scope

# An assignment at Subscription level applies to all
# resource groups and resources within that subscription.

# An assignment at Resource Group level applies only to
# resources within that group.

# Deny assignments always win over allow assignments.
The practical implication: assign access at the lowest scope that makes sense. If an engineer only needs to manage resources in one resource group, assign their role there — not at the subscription level. Least privilege isn’t just a security principle; it’s also far easier to audit and revoke later.
A pattern worth adopting early: assign roles to groups, not individual users. When someone joins or leaves a team, you change one group membership instead of hunting down every resource they had direct access to.
Self-Service Password Reset (SSPR)
The last piece worth setting up early: letting users reset their own passwords without opening a helpdesk ticket. SSPR reduces support load, resolves faster for the user, and costs nothing beyond a P1 licence if you want on-premises writeback.
Configuration lives in the Entra admin centre under Password reset. You choose how many verification methods are required (commonly two) and which methods are allowed — Microsoft Authenticator, email, phone, or security questions.
Try It Yourself
A short hands-on sequence to make the above concrete:
- Create two member users in the Entra admin centre, with different
departmentattribute values — one Engineering, one Finance. - Create a dynamic security group called
sg-engineeringwith the rule(user.department -eq "Engineering"). Wait a few minutes, then confirm only the Engineering user appears as a member. - Create a resource group called
rg-laband assign the Finance user the Reader role on it. Sign in as that user and confirm they can see the resource group but can’t create anything inside it. - Enable SSPR for the
sg-engineeringgroup, requiring two verification methods (Authenticator + email). Sign in as the Engineering user, register both methods, then test a reset ataka.ms/sspr.
Summary
Microsoft Entra ID is the identity layer underneath everything on Azure. Three things to take away:
- Users and groups — member users for your organisation, guest users for external collaborators, and groups — particularly dynamic groups — to manage access at scale without manual overhead.
- RBAC — who can do what, on which resource. Assign at the narrowest scope that makes sense, favour built-in roles where they fit, and assign to groups rather than individuals.
- SSPR — let users help themselves. Lower helpdesk load, faster resolution, minimal cost.
The next article in this series goes deeper on RBAC itself — custom role design, management group scope strategy, managed identities, and Privileged Identity Management (PIM) for just-in-time access instead of standing role assignments.